Friday, June 22, 2012

Preparing Onesies for Baby

Preparando la Ropa del Bebe


This is a very simple and fun  activity where all the family can participate, I bought some crayola fabric markers at Target for $4. and gave them a try. They are very easy to use,  after drawing you can iron the shirts or put them in the dryer for few minutes. That's all!!
I am just trying to give C the chance to be 100% involve on baby's arrival.


Esta es una activdad muy facil y super creativa donde toda la familia puede participar sin ningun problema! Compre marcadores para tela en la tienda Target por el valor de $4.
Despues de dibujar en las camisetas las puedes poner a la secadora o plancharlas por encima de tu diseno y nada mas! Estan listas.


Daddy, C and me decorated some onesises for baby (one week left : ) before he borns..so exciting!


Papa, C y decoramos estas camisetas para nuestro bebe (ya llega en una semana : )


I love how she made a rainbow sidewalk for baby when he comes home.

Me encanto como C dibujo este camino de arco iris hacia nuestra casa para cuando su hermano llegue.Ni yo lo hubiera pensado mejor!!

Wednesday, June 20, 2012

Montessori Baby Mobile TUTORIAL

Montessori Movil para Bebe TUTORIAL


There is one week left for baby's due day so I am trying to put everything together. I made this mobile days ago. C likes it, hope baby will like it too : )

You will need:
- White and Black fabric (I used 4 different kinds but it is your choice)
-scissors
-a butterfly pattern ( depends the size you want it , I used a small one)
- an embroidery hoop
-white or black (I used white) yarn
-thread and needle
- white or black  felted beads or any kind of beads (here for my tutorial on how to make felted beads)
-sewing machine


Me queda una semana antes de que nuestro nuevo integrante de la familia nazca.Hace unas semanas termine de hacer este mobil, a C le encanto, espero que a bebe M tambien le guste : )

Necesitaras:
-Tela blanca y con figuras blancas (use 4 tipos)
-Tijeras
-Un molde de mariposa, yo lo saque de internet y use my impresora para reducir al tamano que yo queria.
- Un aro para bordado
- Lana blanca o negra (yo use blanca)
- hilo blanco y aguja
- y cuentas de fibra de fieltro de color blanco y negro (o cualquier otro tipo de cuentas, es a tu gusto de preferencia blanca y negra)Vaya aqui para mi tutorial de como hacer cuentas de fieltro.


First we start cutting out the butterflies from our fabric ,using our pattern, I cut 14 total (about 4 of each kind of fabric).

Empezamos a trazar y recortar las mariposas de nuestra tela usando nuestro patron de mariposa, corte 14 en total (alrededor 4 mariposas de cada tela).


We lay them down

Las tenemos listas


Now we put one butterfly on top of the other butterfly facing up


Ahora las apareamos, una encima de otra

Now we  use our sewing machine to stitch both butterflies together by the middle, making a straight  line.

Ahora usamos nuestra maquina de coser para unirlas por el centro haciendo una linea recta

 Like this, repeat the same process with all the butterflies


Asi como esta, repite el proceso con todas las mariposas

Now we are going to cover  the hoop with yarn all around

Ahora, usamos lana para enrollar el aro
All the way like this


Todo alrededor

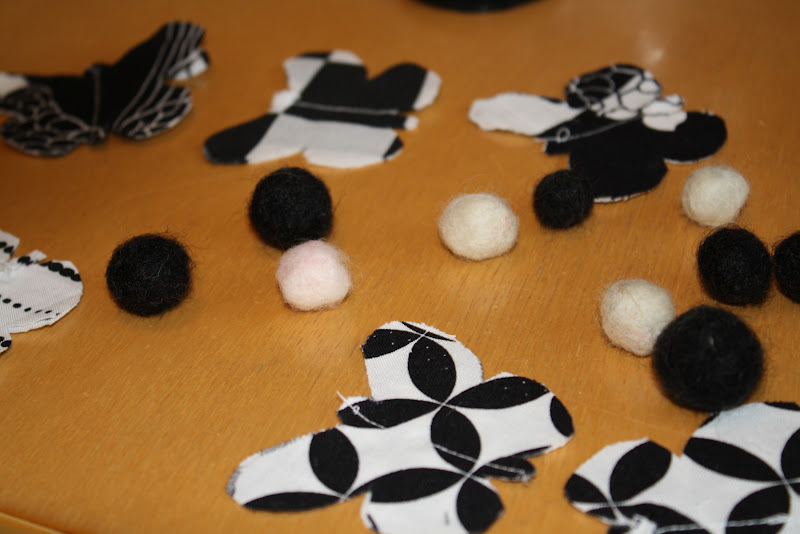
Now we are going to use the butterflies and the beads (I used 10 felted beads..but you can use as many as you like)

Ahora ten listas las mariposas y las cuentas ( hize 10 cuentas en total para este projecto pero usted puede usar mas o tal vez menos)

Use the thread (I used about 20 (50 cm) inches long) and start threading by the middle of the butterfly and the beads leaving space in between one at the time.


Use el hilo y la aguja para poder pasar las cuentas y las mariposas, dejando cierto espacio entre estas, use 4 diferentes tiras, cada una de  20 (50 cm) pulgadas de hilo.

When you are done threading you can tie them to the hoop, repeat the process four times (this way you will have 4 stripes of thread hanging up from the hoop). I used about two butterflies and 2 to 3 beads for each stripe of thread.


Cuando haya terminado de enhebrar usted puede atar las tiras de hilo al aro, repita el proceso cuatro veces (de esta manera usted contará con 4 tiras de hilo colgando del aro). He utilizado cerca de 2 mariposas y 2 o 3 cuentas para cada franja de hilo.
Now you have made a wonderful mobile for your baby..how wonderful!

Acabas de hacer un hermoso movil para tu bebe...maravilloso!!

Now hang it up and admire it ( they recommend to hang up 8-10 inches above the infant's head.These early black and white mobiles help infants develop visual discrimination, tracking, and focus).!! C who is 4 years old start playing with it right away


Ahora cuelgalo y admiralo!(Se recomienda colgar el movil entre 8-10 pulgadas por encima de la cabeza del bebe.Estos móviles de color blanco y negro ayudan a los bebés a desarrollar la discriminación visual, el seguimiento, y la concentracion)Mi pequena C de 4 anios no pudo aguantar las ganas de jugar con este.

The black and white mobile is develop mentally appropriate and provides visual stimulation.
Read this book for more information.


Los moviles de color blanco y negro son fundamentales para el desarrollo y estimulacion visual del bebe.
Lea aqui para mas informacion.

Thursday, June 14, 2012

A kind Letter for SISTER!

Una Carinosa Carta para la Hermana!

C can't stop kissing and hugging my belly..she is counting(we all are) the days for brother to be born. I thought it will be a nice idea if "baby brother" sends a letter once a week to his sister " C".

 
Mi pequena C no para de abrazar y dar besos a mi pansita..esta contando los dias para poder conocer a su hermanito.
Pense que seria una buena idea  que el hermanito le mande una carta una vez a las semana a su hermana, ya que estoy en las ultimas semanas de gestacion.


I used watercolor paint to decorate the paper (watercolor paper) and I wrote a very simple letter saying that baby loves when sister hugs Mommy's belly and talks to him, and also how much baby loves sister already!


Use cartulina a prueba de agua con acuarelas para darle color y escribe una carta muy simple diciendo que el bebe quiere mucho a su hermana mayor y le encanta cuando abraza y da carinos a la pansita de mama ahh y tambien cuantos dias faltan para que se conozcan.


I also painted the envelope and glued am old stamps (I have a big collection of them that we bought at the fair last year). C enjoys checking our mail box and this time she was so excited to get something from baby.

Tambien pinte el sobre y anadi una estampa antigua (compramos una buena cantidad de estas en la feria del anio pasado). A mi C le entusiasma checkear la casilla de correo asi que esta idea sera perfecta! Le emociono mucho recibir noticias del hermanito.


Once she finished reading the letter, she said " I love my baby brother too".
We have two more weeks left so C will get two other letters to keep her posted about how baby is doing and tracking the days until they finally meet.
I also specify in the letters that mommy writes the letters in request of baby brother. so she doesn't get confused, she knows babies can't write : )


Una vez que leyo la carta, me dijo mami " Quiero mucho a mi hermanito".
Tenemos dos semanas mas para mi parto, asi que C recibira dos cartas mas para tenerla al dia de como su hermanito se desarrolla y los dias exactos que faltan para poder cargarlo.
Tambien especifico en la carta que los bebes no escriben pero que pueden pedirle a mama desde la pansita que Mami escriba la carta por ellos : )

Thursday, June 7, 2012

Headband Felted Flower TUTORIAL

Banda de Cabeza hecha de Fibra de Lana TUTORIAL


Remember my last post about our visit to the farm, well we kept some of the wool that C sheared from the sheep. We dyed pink and brought it home. I asked C what could we do with the wool and she say she wanted a headband.

Recuerdan mi último post sobre nuestra visita a la granja? Bueno trajimos a casa algunas sobras de la lana que C esquilo de la oveja, la  teñimos rosa, entonces le pregunté a C ¿qué podíamos hacer con la lana y ella me dijo que quería una banda para la cabeza.


You will need:

Wool roving (2 colors)
Felting needle
A flower shape cookie cutter (I don't have one so I used a snowflake shape that found at my kitchen.it worked great).
A foam mat
A simple headband
and hot glue


Necesitaras:

Fibra de Lana (2 colores)
Aguja para fieltrado
Un cortador de Galletas en forma de flor (yo no tengo la flor asi
que use uno de copo de nieve, y salio bien)
Una esponja como base
Una banda para la cabeza
Goma caliente


                                               Put the wool inside the cookie cutter

Coloca la lana dentro del cortador de galletas


Start using your needle to poke on the wool

Empieza a pinchar la lana con la aguja


Let your child help but please tell her to be careful and not put her fingers on the way of the needle


Deja a tu nene que te ayude pero dile que porfavor tenga cuidado y no ponga sus deditos donde va la aguja porque puede  pincharlos (y duele..dimelo a mi!!)


                 After you think the wool is getting on shape, flip it over and keep poking then take the wool out from the cutter


Cuando veas que la lana esta cogiendo forma, dale la vuelta y repite el mismo procedimiento


Ok Now we are going to work on the button of the flower, get the other color of wool out (we choose purple that I already have) and gently pull a small piece of it


Ahora vamos a hacer el boton de la flor, ten listo el otro color de fibra (usamos morado) y delicadamente jala un trozo pequeno de esta


Roll it to make a small ball

Enrolla la fibra formando una bola


Put in the the center of our flower and start poking it with the needle

Colocala en el centro de la flor y empieza a pinchar con la aguja


Now your flower is ready for the next step

Ahora que ya tenemos la flor sigamos con el siguiente paso


Get the headband, glue gun and the flower ready

Necesitaremos la banda, la flor y la silicona caliente


Put glue into the back of the flower  and glued to the headband

Coloca la goma en la parte posterior de la flor y pegala en la banda


Now you have a unique beautiful wool flower headband and a happy girl... doesn't get better than that!

Ahora tienes una unica y hermosa banda de cabello y una nina feliz!!..mejor premio que ese no hay!


Love you kid!

Te amo mi chikita!


Tuesday, June 5, 2012

Experiencing Nature

Explorando la Naturaleza

C and her friends visit an animal farm  " Party Ponies and Friends"days ago. It was such a cool experience for everyone.
We had the chance to feed the goats,ponies,sheep, pigs and ducks.

 
Llevamos a C y unos amigos a conocer la granja de animales " Party Ponies and Frieds"  hace algunos dias. Nos la pasamos super bien, todos desde los mas peques hasta los papas.
Tuvimos la oportunidad de dar de comer a las cabras, ponies,ovejas. cerditos y patos.


For the very first time C shear a sheep

Fue la primera vez que C esquilo a una oveja


They used the wool from the sheep to make it into felt

 
C and her friends usaron la lana de esta oveja para convertirla en fibra de fieltro


Mrs. Amanda, her aunt  and her wonderful Mom (Montessori Certified Teacher) taught the children  the whole process of wool and felt.

 
La Senora Amanda, su tia y su maravillosa madre (quien es una profesora certificada en el Metodo Montessori) ensenaron a las ninos como seguir el proceso de lana y fieltro.

We all thought it was neat
 
 
Pienso que fue genial

Of course they also have a fun playground on their big yard  and C loved it!

Y por supuesto en esta granja tambien  tienen un set de columpios y juegos genial..C se la paso de maravilla!

oh yeah! And we milked a goat..I have to say it is not easy as it looks, after that I tried goat's milk and it was good!

Oh y tambien ordeñamos una cabra, que les dire no es tan facil como parece..se debe mucha paciencia y tiempo mis amigos.


Even daddy had fun bottle  feeding the baby cow

Hasta papa se la paso bien dandole el biberon a este ternerito


 “Education is a natural process carried out by the child and is not acquired by listening to words but by experiences in the environment.”
Maria Montessori

 
"La educación es un proceso natural llevada a cabo por el niño y no se adquiere escuchando palabras, sino por las experiencias en el medio ambiente. "
Maria Montessori