Showing posts with label crafts. Show all posts

Saturday, January 11, 2014

Decorating Beeswax Candle TUTORIAL

Decorando Velas con Cera de Abeja TUTORIAL


Decorating beeswax candles has been on my list for few months, we finally made the  time to do it. It was fun and easy!
You will need:
-Candles (I use beeswax, but any kind will work,it will make it easier on you ,if you have a candle holder)
-Decorating wax in sheets (I purchased this kit from here)
-scissors
-Mini paper Punch (different shapes, got these set at Michaels for $1 each)


Decorar velas de cera de abeja ha estado en mi lista hace unos meses, finalmente organize el tiempo para hacerlo. Fue divertido y literalmente fácil!
Usted necesitará:
-Velas (yo uso cera de abejas, pero cualquier tipo de velas va bien)
-Cera para decorar en laminas(Compré este kit de aquí)
-tijeras
-Perforador de papel (diferentes formas, consegui éstos en Michaels a $ 1 cada uno)


Start by choosing the colors of the wax that you want to use to decorate the candles

Empieze escogiendo los colores de la cera en laminas a usar


Now use the paper punch to cut the shapes from the decorating wax, this part could get tricky, sometimes the wax gets sticky and it doesn't want to came out from the paper punch, I will suggest to use the paper punch on only one sheet at the time.C really liked this part! she loved the mini shapes, we also used scissors to cut out some different lines and shapes from the sheets.Press gentle on the candle, here is a trick if it doesn't stick really good, light up a tea candle and use it o warm up the candle a little bit, makes it hot and the wax sticks better.

Ahora usa el perforador de papel en las laminas de cera, esta parte puede ser complicada,  a veces la cera se pega y no quiere salir del perforador,por eso les sugiero que utilizen una lamina de cera por vez (en vex de perforar varias laminas al mismo tiempo)pero a C le  gustó mucho esta parte! le encantaron las pequenas figuras que salian del perforador, también puedas utilizar  tijeras para cortar  diferentes líneas y formas de las laminas .
Presiona las figuras o formas de las laminas en la vela para que se adhieran, aquí hay un truco si no se pega muy bien, enciende una vela de té y calienta la vela un poco,ya que la cera caliente pega mas facil.


We use these candles at dinner time, we turn the lights off, light up the candles, pray together and enjoy a nice family dinner.

Usamos estas velas a la hora de la cena, apagamos las luces,encendemos las velas,rezamos y disfrutamos de una cena en familia

Have a good weekend!
Buen fin de semana!

Saturday, August 31, 2013

Fun Ice Dyeing TUTORIAL

Teñido con Hielo TUTORIAL


This is a nice colorful activity easy to do with the kiddos at home. You will need :
-ice trays
-fabric dye (as many colors you want)
-white clothes to dye on
-and creative kids 


Esta es una buena actividad  fácil de hacer con los peques en casa. Usted necesitará:
-bandejas de hielo
-tinte de tela (como muchos colores que desee)
-ropa blanca para teñir 
y niños creativos


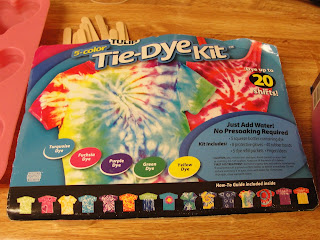
I bought this tie dye kit couple of years ago at Walmart for $14. We have used it for different projects and it lasted for quiet of bit.But you can use any dye you have at home. You also can go here to buy different dyes for fabric.

Compré este set de tinte hace un par de años atrás en Walmart por $14. Lo hemos utilizado para diferentes proyectos y ah durado buen tiempo .Pero puede usar cualquier colorante que tenga en casa. También puedes visitar este sitio para comprar diferentes tintes para telas.


First you fill your ice trays with water and pour a teaspoon of your dye, mix it and freeze it.

En primer lugar llena tus bandejas de hielo con agua y vierta una cucharadita de el tinte, se mezcla y congelelo.


Get ready your whites to start the project

Prepare la ropa blanca  para iniciar el proyecto


Once the ice is ready give it to your child and let her/him have some fun with the colorful ice cubes

Una vez que el hielo este listo deje que su nene se divierta creando con los hielos de colores


I suggest to let the ice cubes sit for a couple of minutes on the fabric before putting them back in the tray

Sugiero que los cubitos de hielo reposen durante un par de minutos en la tela antes de volver a colocarlos en la bandeja


Ice cubes here and ice cubes there and the t shirts will turn so colorful and fun...Let them dry completely then washed them with warm water ,they will be ready to wear them 

Algunos cubos de hielo aquí y otros cubos de hielo allí y las camisetas se volverá tan coloridas ... Deje que se sequen completamente, luego lavar con agua tibia y estarán listas para usarlas.


Have a nice weekend!

Un feliz fin de semana!

Monday, July 22, 2013

Build Your Own Toy House

 
Crea Tu Propia Casa de Juguete                                


This was such a fun project! I saw this idea on The Artful Parent and I knew C will enjoy it.

Este fue un proyecto divertido! Vi esta idea en El Padre Ingenioso y sabía que a C le agradaria


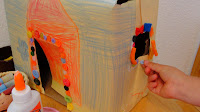
C had one of her friends over that day so we decided that it will be just the perfect project to they to make.First we looked for two small boxes and I was so lucky to found two.Then I cut doors, windows and make the shape of a roof.


C tuvo uno de sus amigos en casa ese día, así que pense que era el proyecto perfecto para ese dia. Primero buscamos dos cajas pequeñas y  tuve la suerte de encontrar dos.Con ayuda de las tijeras recorte  puertas, ventanas y hacer la forma del techo.


Next I gave the kiddos some drawing paper to draw and color on it.

Luego les di a los pequespapel para dibujar y colorear 


We glued the paper they colored on the box

Pegamos el papel  coloreado en la caja


C and her friend decorate the house with : poms,colored pasta ,buttons, scrapbooking flowers, beads, glitter and watercolor paint.

C y su amigo decoraron la casa con: pompones, pasta de colores, botones, scrapbooking flores, perlas, escarcha y pintura de acuarela.


After they were done decorating the toy houses, we put some tiny friends to play in.

Una vez terminado su projecto, buscaron algunos pequenos amiguitos para que jueguen en ellas


And some flashlights too...I love the simplicity of being a kid...don't you?

Y algunas linternas también ... Me encanta la simplicidad de ser  niño ... ¿a ti..no?


Sunday, July 14, 2013

Our Peg Doll Family TUTORIAL

Nuestra Familia de Clavijas de Madera


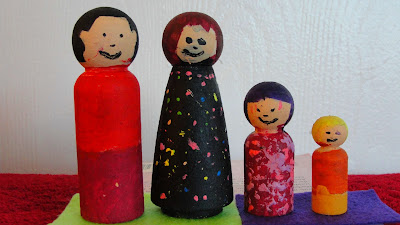
I bought some wooden peg dolls for C's birthday several months ago ,she was very excited on making "peg dolls family". I have some people asked me on how to paint peg dolls and where to get them, well since I am not an expert on this topic I will just share with you what we did.
For this project you will need:
-wooden peg dolls (I purchased them here)
-acrylic paint
-brushes,wipes and alcohol to wash off the paint from the brush
-toothpicks
-a pencil


Compré algunas clavija de madera por el cumpleaños de C hace ya varios meses, ella estaba muy emocionada en hacer "una familia de clavijas". Algunos de ustedes me han preguntado sobre cómo pintar los muñecos de clavija y dónde conseguirlos,pero como yo no soy una experta en este tema sólo voy a compartir con ustedes lo que hicimos.
Para este proyecto se necesita:
-clavija de madera (las compré aqui )
-pintura acrílica
-pinceles, trapos y alcohol para enjuagar los pinceles
-mondadientes
-un lápiz


First we draw the head, the face and then the body of each peg using a pencil.

Primero se dibuja la cabeza la cara y luego el cuerpo de cada clavija con un lápiz.


Then we start painting the hair

Luego empezamos a pintar con la pintura acrilica el cabello


Let it dry for a couple of minutes and start painting the face and then the body

Dejar secar durante un par de minutos y empezar a pintar la cara y luego el cuerpo


Since C knows I like the colors black as much as I like polka dots she decided to use a tooth pick to make colorful dots on my black peg doll mama dress.so cute!

 C sabe que me gusta el color negro tanto como me gustan los lunares de colores, ella decidió utilizar un mondadiente  para hacer puntos de colores en mi vestido negro. lindo!


I think our peg doll family rocks!!As a final touch we built a house  from craft sticks and hot glue for our family peg to live in.

Nuestra familia de clavijas queda muy original! Como toque final hicimos una casa de palitos de madera con pegamento caliente para que viva la familia clavija : )


Did you sign up to win a $50 gift certificate from Montessori Services, go here?

Wednesday, December 19, 2012

Holiday Crayons Tutorial

Crayolas en forma de arbol de Navidad


This is a fun and easy activity that you can do with your child following the Christmas spirit.

Esta es una actividad muy sencilla y divertida que puedes hacer con tus ninos siguiendo con las celebraciones por la Navidad.


First select the colors of crayons you want to use and sort them.

Primero selecciona los colores que quieres usar


Then peel the paper off from the crayons

Luego pela el papel de la crayola


Then brake them in small pieces and put them inside your tree silicone shapes (I bought this set at target the last year in 90% sale after Christmas was over)

Luego rompe las crayolas en trozos pequenos y colocalos en tus arboles de silicona (yo compre estos en target el anio pasado por 90% de oferta ,despues de las fiestas Navidenas)


Put them in your oven for 265 degrees for 20-25 minutes long, until it the wax melts completely. Get your molds out from the oven and let them cool for about 30 minutes or so.

Ingresa tus arboles al horno a temperatura de 265 grados por aproximadamente 20-25 minutos, hasta que la cera este completamente derretida. Retira tus moldes del horno y dejalos enfriar por aproximadamente 30 minutos.


Get the trees out from your molds gently if you break (just like I did) just put them inside the oven again.

Retira las crayolas de los moldes de manera delicada, pero si llegas a romper algunos (como yo lo hize), simplemente ponlos dentro del horno otra vez.
 

You can use these cool crayons as stocking gifts as well or as gifts for your child's friends too.
Go here to see my valentine's heart crayons.

Puedes usar estas crayolas para ponerlas en las medias de Navidad que van en la chimenea como regalos para la Noche buena o simplemente como regalos para los amiguitos de los nenes.
Vaya aqui para ver mi tutorial de crayolas de corazones

Monday, August 6, 2012

Butterfly Mask

Mascara de Mariposa

Since we have a new baby at home we are changing our routine a little bit, C still has activities to work on her classroom at home, these are 100% self-independent. One of these activities was to create a mask, this week she made a butterfly mask.
(These kind of activities give me some time to change diapers, check on the laundry or just breastfeed baby)

 
Bueno aun estamos ajustando la nueva rutina de tener un nuevo bebe en casa, asi que eh preparado actividades en los estantes totalmente auto-independientes para C. Una de estas actividades es crear tus propios proyectos de arte, esta vez fue una mascara de mariposa.
(Este tipo de actividades me dan tiempo libre para cambiar el panal del hermanito,checkear la lavanderia o simplemente darle el pecho)


I put in the tray : small pieces of felt,feathers,glitter,buttons,flower felt stickers and she also use dot and dot paint, markers , pipe cleaners and purple foam that she cut from a butterfly pattern.


Puse en la bandeja : pequenos pedacitos de fieltro,plumas de colores,escarche o brillantina,botones, pegatinas de flores, limpia pipas, marcadores y goma eva.


Then she used her imagination and put this mask together.

C uso su imaginacion y creo su mascara.


 Then we played and flew around the house.
I wonder what will she create next week?

Luego jugamos y pretendimos ser mariposas volando alrededor de la casa.
La proxima sema..que creara?

Friday, July 20, 2012

Easy Beaded Fairy Crown

Corona de Hadas con Cuentas y Cintas


This is a very simple crown to make, you will need: wire, beads and ribbons.


Esta es una corona muy facil de hacer, necesitaras : alambre, cuentas y cintas de diversos colores.


Let your little fairy insert the beads on the wire (do you remember the flower crown? from two years ago..yes! She still plays with it : )

Tu hadita en casa puede insertar las cuentas en el alambre (recuerdan esta corona de flores de hace dos anios? sii...aun jugamos con esta : )


And tie the ribbons to the wire (C needed help with this part)

 
y puede amarrar las cintas en el alambre (C necesito mi ayuda en esta parte)


To close both ends of the crown I used self-adhesive satin ribbon (I bought this set over a year ago and love it..pretty handy).

Para cerrar los extremos de la corona use  cinta adhesiva morada  (compre este set de cintas hace mas de un anio..y las uso casi para todo proyecto, son muy convenientes)


Now that you are done, let your little fairy dream, imagine and play with her new crown!!


Deja que tu hada suene, imagine y juegue con su nueva corona!!


Hope you all are enjoying this time of the year : )

Espero que esten disfrutando esta estacion de anio : )

Friday, June 22, 2012

Preparing Onesies for Baby

Preparando la Ropa del Bebe


This is a very simple and fun  activity where all the family can participate, I bought some crayola fabric markers at Target for $4. and gave them a try. They are very easy to use,  after drawing you can iron the shirts or put them in the dryer for few minutes. That's all!!
I am just trying to give C the chance to be 100% involve on baby's arrival.


Esta es una activdad muy facil y super creativa donde toda la familia puede participar sin ningun problema! Compre marcadores para tela en la tienda Target por el valor de $4.
Despues de dibujar en las camisetas las puedes poner a la secadora o plancharlas por encima de tu diseno y nada mas! Estan listas.


Daddy, C and me decorated some onesises for baby (one week left : ) before he borns..so exciting!


Papa, C y decoramos estas camisetas para nuestro bebe (ya llega en una semana : )


I love how she made a rainbow sidewalk for baby when he comes home.

Me encanto como C dibujo este camino de arco iris hacia nuestra casa para cuando su hermano llegue.Ni yo lo hubiera pensado mejor!!