Showing posts with label waldorf crafts. Show all posts

Saturday, January 11, 2014

Decorating Beeswax Candle TUTORIAL

Decorando Velas con Cera de Abeja TUTORIAL


Decorating beeswax candles has been on my list for few months, we finally made the  time to do it. It was fun and easy!
You will need:
-Candles (I use beeswax, but any kind will work,it will make it easier on you ,if you have a candle holder)
-Decorating wax in sheets (I purchased this kit from here)
-scissors
-Mini paper Punch (different shapes, got these set at Michaels for $1 each)


Decorar velas de cera de abeja ha estado en mi lista hace unos meses, finalmente organize el tiempo para hacerlo. Fue divertido y literalmente fácil!
Usted necesitará:
-Velas (yo uso cera de abejas, pero cualquier tipo de velas va bien)
-Cera para decorar en laminas(Compré este kit de aquí)
-tijeras
-Perforador de papel (diferentes formas, consegui éstos en Michaels a $ 1 cada uno)


Start by choosing the colors of the wax that you want to use to decorate the candles

Empieze escogiendo los colores de la cera en laminas a usar


Now use the paper punch to cut the shapes from the decorating wax, this part could get tricky, sometimes the wax gets sticky and it doesn't want to came out from the paper punch, I will suggest to use the paper punch on only one sheet at the time.C really liked this part! she loved the mini shapes, we also used scissors to cut out some different lines and shapes from the sheets.Press gentle on the candle, here is a trick if it doesn't stick really good, light up a tea candle and use it o warm up the candle a little bit, makes it hot and the wax sticks better.

Ahora usa el perforador de papel en las laminas de cera, esta parte puede ser complicada,  a veces la cera se pega y no quiere salir del perforador,por eso les sugiero que utilizen una lamina de cera por vez (en vex de perforar varias laminas al mismo tiempo)pero a C le  gustó mucho esta parte! le encantaron las pequenas figuras que salian del perforador, también puedas utilizar  tijeras para cortar  diferentes líneas y formas de las laminas .
Presiona las figuras o formas de las laminas en la vela para que se adhieran, aquí hay un truco si no se pega muy bien, enciende una vela de té y calienta la vela un poco,ya que la cera caliente pega mas facil.


We use these candles at dinner time, we turn the lights off, light up the candles, pray together and enjoy a nice family dinner.

Usamos estas velas a la hora de la cena, apagamos las luces,encendemos las velas,rezamos y disfrutamos de una cena en familia

Have a good weekend!
Buen fin de semana!

Sunday, July 14, 2013

Our Peg Doll Family TUTORIAL

Nuestra Familia de Clavijas de Madera


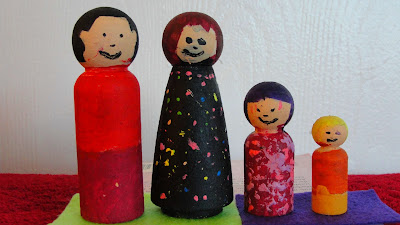
I bought some wooden peg dolls for C's birthday several months ago ,she was very excited on making "peg dolls family". I have some people asked me on how to paint peg dolls and where to get them, well since I am not an expert on this topic I will just share with you what we did.
For this project you will need:
-wooden peg dolls (I purchased them here)
-acrylic paint
-brushes,wipes and alcohol to wash off the paint from the brush
-toothpicks
-a pencil


Compré algunas clavija de madera por el cumpleaños de C hace ya varios meses, ella estaba muy emocionada en hacer "una familia de clavijas". Algunos de ustedes me han preguntado sobre cómo pintar los muñecos de clavija y dónde conseguirlos,pero como yo no soy una experta en este tema sólo voy a compartir con ustedes lo que hicimos.
Para este proyecto se necesita:
-clavija de madera (las compré aqui )
-pintura acrílica
-pinceles, trapos y alcohol para enjuagar los pinceles
-mondadientes
-un lápiz


First we draw the head, the face and then the body of each peg using a pencil.

Primero se dibuja la cabeza la cara y luego el cuerpo de cada clavija con un lápiz.


Then we start painting the hair

Luego empezamos a pintar con la pintura acrilica el cabello


Let it dry for a couple of minutes and start painting the face and then the body

Dejar secar durante un par de minutos y empezar a pintar la cara y luego el cuerpo


Since C knows I like the colors black as much as I like polka dots she decided to use a tooth pick to make colorful dots on my black peg doll mama dress.so cute!

 C sabe que me gusta el color negro tanto como me gustan los lunares de colores, ella decidió utilizar un mondadiente  para hacer puntos de colores en mi vestido negro. lindo!


I think our peg doll family rocks!!As a final touch we built a house  from craft sticks and hot glue for our family peg to live in.

Nuestra familia de clavijas queda muy original! Como toque final hicimos una casa de palitos de madera con pegamento caliente para que viva la familia clavija : )


Did you sign up to win a $50 gift certificate from Montessori Services, go here?

Thursday, June 7, 2012

Headband Felted Flower TUTORIAL

Banda de Cabeza hecha de Fibra de Lana TUTORIAL


Remember my last post about our visit to the farm, well we kept some of the wool that C sheared from the sheep. We dyed pink and brought it home. I asked C what could we do with the wool and she say she wanted a headband.

Recuerdan mi último post sobre nuestra visita a la granja? Bueno trajimos a casa algunas sobras de la lana que C esquilo de la oveja, la  teñimos rosa, entonces le pregunté a C ¿qué podíamos hacer con la lana y ella me dijo que quería una banda para la cabeza.


You will need:

Wool roving (2 colors)
Felting needle
A flower shape cookie cutter (I don't have one so I used a snowflake shape that found at my kitchen.it worked great).
A foam mat
A simple headband
and hot glue


Necesitaras:

Fibra de Lana (2 colores)
Aguja para fieltrado
Un cortador de Galletas en forma de flor (yo no tengo la flor asi
que use uno de copo de nieve, y salio bien)
Una esponja como base
Una banda para la cabeza
Goma caliente


                                               Put the wool inside the cookie cutter

Coloca la lana dentro del cortador de galletas


Start using your needle to poke on the wool

Empieza a pinchar la lana con la aguja


Let your child help but please tell her to be careful and not put her fingers on the way of the needle


Deja a tu nene que te ayude pero dile que porfavor tenga cuidado y no ponga sus deditos donde va la aguja porque puede  pincharlos (y duele..dimelo a mi!!)


                 After you think the wool is getting on shape, flip it over and keep poking then take the wool out from the cutter


Cuando veas que la lana esta cogiendo forma, dale la vuelta y repite el mismo procedimiento


Ok Now we are going to work on the button of the flower, get the other color of wool out (we choose purple that I already have) and gently pull a small piece of it


Ahora vamos a hacer el boton de la flor, ten listo el otro color de fibra (usamos morado) y delicadamente jala un trozo pequeno de esta


Roll it to make a small ball

Enrolla la fibra formando una bola


Put in the the center of our flower and start poking it with the needle

Colocala en el centro de la flor y empieza a pinchar con la aguja


Now your flower is ready for the next step

Ahora que ya tenemos la flor sigamos con el siguiente paso


Get the headband, glue gun and the flower ready

Necesitaremos la banda, la flor y la silicona caliente


Put glue into the back of the flower  and glued to the headband

Coloca la goma en la parte posterior de la flor y pegala en la banda


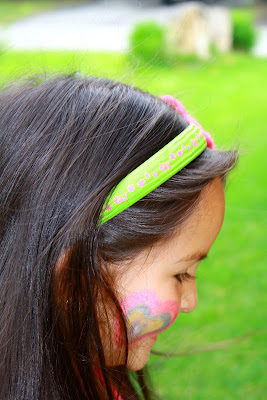
Now you have a unique beautiful wool flower headband and a happy girl... doesn't get better than that!

Ahora tienes una unica y hermosa banda de cabello y una nina feliz!!..mejor premio que ese no hay!


Love you kid!

Te amo mi chikita!


Monday, November 7, 2011

Beewax Tea Light Candles TUTORIAL

Velitas  Hechas de Cera de Abeja


You know that I love working with beewax candles, so I decided to make some tea light beewax candles. You will need:
-Regular(cheap ones) tea light candles. (I bought these valentines candles three years ago before I discover the love for beewax).
-Beewax
-A glass container
-Water
-A pan

Algunos de ustedes sabe lo mucho que me gusta trabajar con velas de cera de abeja, esta vez hize unas velitas pequena de esta cera. Necesitaran:

-Velitas de te (las corrientes). Yo compre estas para un dia de valentin hace tres primaveras y aun las tengo, imaginense.
-Cera de Abeja
-Una botella vacia de vidrio
-Agua
- Una olla


First you need to get the tea candles out from the mold, it's super easy, just dump them out.

Primero tenemos que sacar las velitas de estos moldes de metales .Simplemente pongalas de cabeza y saldran.


Pull down gently the wick from the tea candle.Just like the picture.

Una vez que las velitas esten fuera del molde, tenemos que sacar la mecha de la vela, simplemente jale delicadamente hacia abajo.Hasi como en la foto.


Now we have  the wick and the metal cups ready to start the second step.

Ahora que tenemos la mecha y los moldes podemos empezar con la segunda etapa del projecto.


Fill the pot with water about halfway up. Boil water in the pot,then place chunks of  beeswax in a glass container and place it in the boiling water.

Llene la olla con agua hasta la mitad. Hierva el agua en la olla luego coloque la cera de abejas en un recipiente de vidrio y colóquelo en el agua hirviendo.


Now pour the melted beewax into the metal cups. Do it very carefully, hot beewax can burn you badly.
Vierta la cera de abeja en los moldes. Hagalo de  manera muy cuidadosa ya que esta cera quema muy fuerte!


Now you have your own beewax tea  light candles!! Enjoy..

Ahora tienes tus propias velitas para el te hechas de cera de Abeja!! Disfruta..

Monday, October 3, 2011

Tie-Dyeing Silk

Tenido de Seda


We love playing with silks and trying new dyeing experiments with colors. I order some new silks from this site (the prices are very reasonable and I was surprise how fast they arrived here).
First we soaked our silk in warm water and vinegar for 20 minutes.


Nos encanta jugar con  seda y probar nuevos experimentos de tenido con los colores. Yo compre algunas sedas nuevas de este sitio (los precios son muy razonables y me sorprendió la rapidez con la que llegó).
En primer lugar, remojamos nuestra seda en agua tibia y vinagre durante 20 minutos.


Then we squeeze out the excess water /vinegar and tie the  silk in our desired pattern with rubber bands and start squirting on the colors as you like.C chose purple for one, yellow for the other y for our largest silk she chose rainbow colors. This time I used the  tie dye kit is made by Tulip and purchased at Walmart. We used only a little bit for these three silks, we have storage the rest for our future projects.

Luego exprimimos el exceso de agua /vinagre de la seda .Luego amarra con ligas de la manera que tu gustes la seda(nosotras la separamos en cuadrados de partes iguales), ahora puedes empezar a tenir tu seda con ayuda de un rociador. C escogio morado para una, amarillo para la otra y para la seda mas larga escogio los colores del arco iris. Yo  utilize  el kit de tinte de la marca Tulip que encontre en la tienda  Walmart, use muy poco de este aun me queda mucho para para otros proyectos futuros.

Put the silk in a zip lock baggie and let it  sit for 20 minutes, then rinse your  silk with warm water in your bathroom sink until the water is clear.

Apenas acabaste de hechar el tinte en las sedas las colocas en unas bolsitas de plastico, de esas que tiene cierre termico y las dejas reposar por 20 minutos, luego las enjuagas con agia tibia en tu lavamanos del lavabo o de la cocina.

Now you can hang it up ,let it dry and enjoy the magic colors.

Ahora las cuelgas y las dejas secar y asi puedes disfrutar de los hermosos colores de tus sedas.

C likes her rainbow silk so much that she dances with it : )

A mi C le gusta mucho su seda de arco iris..hasta baila con esta : )

Happy Dying

Feliz Teñido

PATTY


Wednesday, September 21, 2011

Silk Streamer with Ribbons

Pulsera de Seda con Cintas de Colores

 
In our daily routine we play with music and dance, it is a moment that C really enjoy.. Music invites children to express themselves through dance, songs and movement.
I made these Silk Streamers with colorful ribbons to be used on dancing time, it was a HUGE HIT!! She is so in love with them.

En nuestra rutina diaria jugamos con música y  danza, es un momento que C disfruta  mucho.
El arte de la música invita a los niños a expresarse a través del baile, las canciones y el movimiento.
 Es por eso que hice estas serpentinas de seda con cintas de colores que se utilizamos a la hora del baile. Fue la novedad!!! A mi C le encantaron!!


First:
To make the fabric bracelets (I used silk)but you can use any kind of fabric,  you will need to use the steps on this tutorial that I found for you.

Primero:
Para hacer estos brazaletes de tela (en mi caso, yo use seda) pero usted puede usar cualquier tipo de tela eh. Para ahorrarme el trabajo de postear el procesos de como hacer el brazalete, encontre un blog que lo da paso a paso, haga clicl aqui para verlo.


Once you have the bracelets made you just need to get your ribbons out (I used 6 different colors), a lighter , scissor and a sewing machine.

Una vez que tenga las pulseras hechas sólo tiene que conseguir cintas de diferentes colores (yo use 6 colores), un encendedor, tijeras y una máquina de coser.

Cut long strips of each ribbon (I used 1 yard of length  for each ribbon for each bracelet).

Cortar tiras largas de cada cinta (yo usé 1 yarda de longitud por cada cinta para cada brazalete)

Then use the lighter to start  burning  the ends of each strip of ribbon  to avoid the ribbon to get frayed.  Repeat the same process with all the strips of ribbons.

A continuación, utilize el encendedor para empezar a quemar  los extremos de cada tira de cinta para evitar que la cinta se deshilache. Repita el mismo proceso con todas las tiras de cintas.


Next you can use your sewing machine to stitch each strip of ribbon to the bracelet.

A continuación, utilice la máquina de coser para coser cada tira de cinta en la pulsera.


Just like this. Once you're done, ask your child to put it on her/his wrist.

Mas o menos asi. Una vez terminado pidale  a su nene que se lo ponga en la muneca de la mano.

Now you have a colorful streamer made with love, you can let your child  use her imagination and movement.

Ahora usted tiene una serpentina de colores hecha con amor ,deje que su nena use su imaginacion y movimiento.

Patty